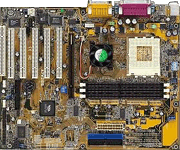
Fitting the Motherboard
Fitting the motherboard inside your PC Case
With the PC Case ready, collect together the 'fixings' kit and follow these steps.
Unpack the Motherboard. You will notice that it is packaged in a special bag (usually black or silver in colour.) This is a special anti-static bag. Try to keep the motherboard inside this bag until it is needed.
A good quality motherboard will be supplied with a User Manual, driver disk/CD and all the cables you will need to configure your PC, including a Floppy Drive cable, one or more IDE cables and where supported, one or more Serial-ATA cables. In addition, you should also receive an IO Shield which can be fitted into the PC Case to match the connectors on the motherboard.
You will notice, in various places on the motherboard, there are small holes with bare metal 'rings' around them. These can be used to fix the motherboard to the inside of the PC Case.
Warning
Under NO circumstances
should the motherboard be mounted such that the back of the board is in contact
with the metal case. This will cause a short-circuit and could damage the motherboard.

Find the corresponding points inside the case and fit the standoffs as appropriate to allow you to screw the motherboard into place. The standoffs should raise the motherboard around half an inch off the metal mounting plate, preventing a short-circuit.
Look closely at the Motherboard shown here. You will notice a collection of coloured 'blocks' along the top right edge. These are the connectors for the Keyboard, Mouse, USB etc. The Motherboard should always be fitted such that these are accessible to the rear of the case.